
Step-By-Step Guide On How To Replace A Bathroom Faucet
One of the ways to give your bathroom a new look is installing a new faucet. Regardless of whether you are doing some renovations in your bathroom or just replacing a worn out faucet, this is something you can do with ease.
This article will give you a step-by-step guide on How To Replace A Bathroom Faucet:
Get Your Tools And Supplies Ready
For you to install a faucet you need some tools:
- A new faucet
- Basin wrench
- Bucket
- Adjustable wrench
- Measuring tape
- Flashlight
- Soap or cleaner
- Plumber’s tape
- Scrubber or sponge
- Rag
Buying A Faucet
When purchasing a faucet the important thing to keep in mind is getting one that fits your sink. If you have some doubt, carry the old one with you to the store.
Remove The Old Faucet
Step 1: The first thing you must do is to turn off the water. Mostly you will find the shutoff valves under the sink, or else you can
just use the main valve to turn off the water.
Step 2: To drain all the water or pressure found in the lines turn on the faucets and leave them for some time until all the water drains out. This will help avoid water damage or leaks when you remove the old faucet.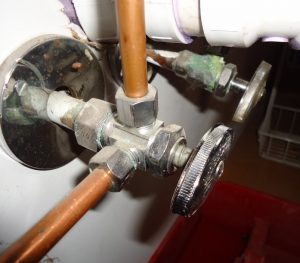
Step 3: You can either use your hands or a basin wrench to disconnect all the supply lines from their connection.
Step 4: Before removing the old faucet, you must loosen the lock nuts. You will find the lock nuts under the sink attached to the tailpieces. Use an adjustable wrench to unbolt the nuts.
Step 5: With the help of a scrubber or a sponge, scrub the holes where faucet sits. Use soap or detergent. Once you are satisfied the area is clean, use water to rinse it then pat it dry.
Step 1: First, you need to install the gasket –a plastic piece or rubber found between the sink and the faucet. A gasket prevents leaks and acts as a seal. Position the gasket on the bottom of the faucet. If your gasket did not come with the faucet, you must  apply a sealant before fitting the faucet. Follow the instructions from the manufacturer and ensure you apply a sealant before you position your new faucet.
Step 2: Use a plumber’s tape to wrap up all threads. The plumber’s tape helps to make a great seal between different components. Enclose the edges of Faucet tailpipes with a plumber’s tape; ensure the tape does not go past the end of the pipe.
Step 3: Using both hands carefully insert the new faucet and fit it into the holes. Ensure the valves and tailpipes match the right holes and put the faucet into position. After positioning the faucet in the mounting holes, place a washer on every tailpipe and twist the nuts to tighten them –turn them clockwise. To finish tightening the nuts, use an adjustable wrench.
Caution: DO NOT tighten the nuts too much to avoid damaging the sink.
Step 4: In this step, you should connect the water supply hoses. First, connect the hoses to the faucet. Ensure that every hose is attached to a tailpipe and then use your hand to tighten the nut. Use a basin wrench to tighten the nuts further.
Step 5: Once you ensure all the nuts are well tightened, it is now time to test your new faucet. Turn on the water and check for drips and leaks.
NOTE: To flush your new faucet, allow cold and hot water to run for about 1-2 minutes.
Contact Us if you have any comments or questions.