How to Re-Caulk Your Bathtub Like a Pro
When it comes to household fittings, even the best of jobs begin to show signs of wear and tear over time. A bathroom and specifically a bathtub, an essential component of everyday use also begins to show signs of deterioration. The caulk around a bathtub keeps water from getting in between the cracks/joints of the tub but after a period, the caulk starts to crumble letting water get between joints causing mildew and mold to develop. When this happens, you could call a professional to reset the caulk or alternatively you could choose to do it yourself. Below we will go over the step by step process of doing it yourself both effectively and efficiently.
Tools you will need:
- Surface cleaner
- Sponge(non-abrasive)
- Sharp knife
- Hairdryer
- Razor blade
- Vacuum (optional)
- Clean cloth or towels
- Rubbing alcohol/white vinegar
- Caulk
- Spray water bottle
- Painters tape
First, you will need to do a general clean up of the surface area from soap scum and dirt. Use a surface cleaner and sponge to remove and prepare the surface.
Determine whether the existing caulk is silicone based or water based, pva or latex. Use a knife to cut the caulk and if it is hard then it is water based while if it is rubbery then it is silicone based. The former can be removed by using a hairdryer to soften the caulk while the latter can be removed using a razor blade. Take the knife and test an existing area of old caulk before beginning. Remove the section of existing caulk while checking to make sure the bathtub is not scraped. If not, then proceed to remove all the old caulk.
Remove any pieces of caulk left over after the scraping and clean the surface using rubbing alcohol or white vinegar.
Vacuum any caulk that may have gotten lodged between the tile and use a 90% water and 10% bleach solution to a sit on the area and prevent the build-up of mold for a few minutes. Scrub and rinse thoroughly with water then allow to dry overnight.
Tape off either side of the seam you are about to apply new caulk to with tape, this will allow for easier cleanup. Cut the caulk tube tip at a 45-degree angle.
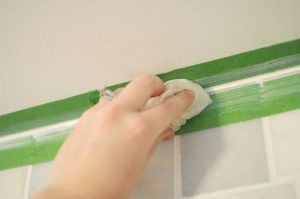
Squeeze the caulk into the joint and run your finger over it to smooth it in place then wipe off any excess residual with a sponge. Alternatively, you could use ice as the caulk will not stick and the Ice will melt perfectly into your desired shape.
Reapply caulk to any areas that seem uneven or thinner then smooth over again with a wet finger and sponge down.
Remove the tape carefully and then let the caulk to dry and set for a period of 24 hours. Once the new caulk has been given time to cure, rinse and clean the surface area once again before using.
Although others insist on calling for assistance, with the above steps and considerations even you too can learn how to re-caulk your bathtub like a pro.
Please Submit Your Tips or Contact Us if you have other suggestions for reapplying caulk around your bathtub.